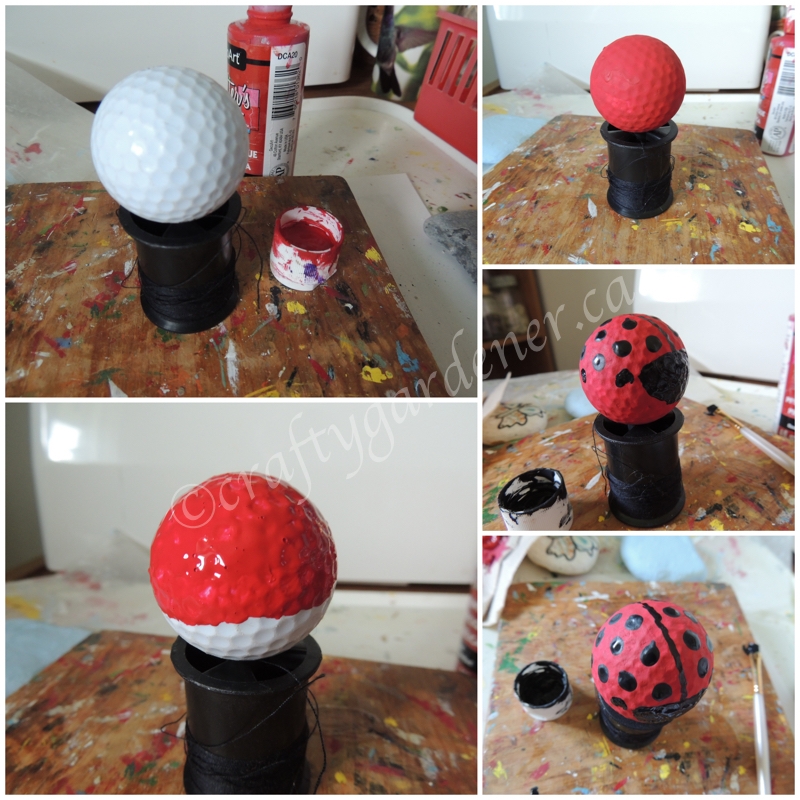
To paint a golf ball, clean it thoroughly and apply a primer. Use acrylic paint for durable and vibrant results.
Painting a golf ball can be a fun and creative project. Customizing your golf balls not only makes them unique but also helps in easy identification on the course. Start by cleaning the ball to remove dirt and grease. Apply a primer to ensure the paint adheres well.
Use high-quality acrylic paint for the best finish. After painting, allow the ball to dry completely. Seal the paint with a clear coat to protect it from wear and tear. This simple process can transform your golf balls into personalized works of art. Enjoy the game with your custom-designed golf balls!
Materials Needed
Painting a golf ball can be fun. Use the right materials for the best results. Let’s explore the essential items required to get started.
Paint Types
Different paints work best for golf balls. Here are the recommended options:
- Acrylic Paint: Dries quickly and offers vibrant colors.
- Spray Paint: Provides an even coat and smooth finish.
- Enamel Paint: Durable and long-lasting for outdoor use.
Tools And Accessories
Gather these tools and accessories before you start painting:
| Tool | Purpose |
|---|---|
| Paint Brushes | For detailed designs and touch-ups. |
| Painter’s Tape | To mask areas and create patterns. |
| Sandpaper | To smooth the surface of the golf ball. |
| Primer | Ensures paint adheres well to the ball. |
| Clear Coat | Protects the paint and adds shine. |
With these materials, you can create beautiful designs. Happy painting!

Credit: craftygardener.ca
Preparation
Proper preparation is crucial for painting a golf ball. It ensures a smooth and long-lasting finish. This section will guide you through the necessary steps for preparation. Follow these steps to achieve the best results.
Cleaning The Golf Ball
First, you need to clean the golf ball. Use warm water and mild soap. Scrub the ball with a soft brush. Remove all dirt and grime. Rinse the ball with clean water. Dry it thoroughly with a clean towel.
Sanding For Adhesion
Next, sand the golf ball for better paint adhesion. Use fine-grit sandpaper, around 400 to 600 grit. Gently sand the surface of the ball. This creates tiny scratches. These scratches help the paint stick better. Be careful not to sand too hard. You don’t want to damage the ball.
After sanding, wipe the ball with a damp cloth. Remove any dust from sanding. Let the ball dry completely. Now, your golf ball is ready for painting.
Setting Up Workspace
Before you start painting your golf balls, it’s crucial to set up a proper workspace. A well-organized area ensures you can work efficiently and avoid messes. Here are some steps to help you get started.
Choosing A Location
Pick a spot with good lighting. Natural light is best, but bright artificial lights work too. Ensure the area is well-ventilated. Paint fumes can be harmful if inhaled. A garage or outdoor patio are ideal places to paint.
Make sure you have a flat, stable surface to work on. A sturdy table or workbench is perfect. This will help keep your materials from falling over. You’ll need space to lay out your supplies and finished golf balls.
Protective Measures
Cover your work area with a plastic sheet or old newspapers. This will protect your table from paint spills. Tape the edges down to keep the cover in place.
Wear old clothes or an apron. Paint can stain fabric, so it’s best not to wear your favorite shirt. Use gloves to keep paint off your hands. Disposable gloves are convenient and easy to use.
Keep a damp cloth or wet wipes nearby. These will help you clean up any accidental spills quickly. Having a trash can close by is also useful for disposing of used materials.
| Item | Purpose |
|---|---|
| Plastic Sheet or Newspapers | Protects workspace |
| Old Clothes or Apron | Protects your clothing |
| Gloves | Keeps hands clean |
| Damp Cloth or Wet Wipes | Quick cleanup |
| Trash Can | Dispose of waste |
Base Coat Application
Applying a base coat is a crucial step in painting a golf ball. This step ensures the paint sticks well and looks great. Below, we’ll guide you through the process of choosing a base color and applying it evenly.
Choosing A Base Color
First, select a base color for your golf ball. This color will be the primary shade. Choose a color that matches your design idea.
- White: A classic and clean choice.
- Bright Colors: Make your ball easy to spot.
- Dark Colors: Ideal for contrast with lighter designs.
Pick a paint that’s suitable for plastic surfaces. This will ensure durability and a smooth finish.
Applying Evenly
Applying the base coat evenly is very important. Use a small brush or spray paint for this step.
- Hold the golf ball securely.
- Apply a thin, even layer of paint.
- Let the paint dry completely.
- Check for any missed spots.
- Apply a second coat if needed.
Tip: Rotate the ball while painting to cover all sides. Ensure each layer dries fully before adding another.
Now your golf ball is ready for the next steps. The base coat is the foundation of a beautiful design.
Design Ideas
Painting a golf ball can be a fun project. It lets you show off your creativity. Choose from simple patterns or advanced techniques. This guide will help you make your golf ball unique.
Simple Patterns
Simple patterns are easy to create. They add a personal touch to your golf ball. Here are some easy ideas:
- Polka Dots: Use different colors for a playful look.
- Stripes: Paint stripes in your favorite colors.
- Checkerboard: Alternate two colors for a bold effect.
Advanced Techniques
Advanced techniques require more skill. They make your golf ball stand out. Here are some advanced design ideas:
- Ombre Effect: Blend colors from dark to light.
- Geometric Shapes: Use stencils for precise shapes.
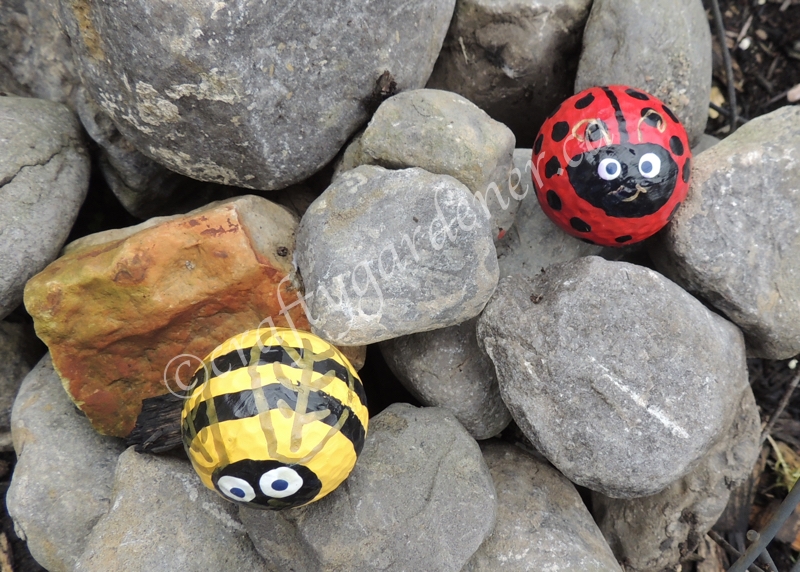
- Nature Themes: Paint flowers, leaves, or even animals.
Use these design ideas to make your golf ball unique. Whether you choose simple patterns or advanced techniques, have fun!
Painting Techniques
Painting a golf ball can be fun. It lets you show creativity. Learn the best techniques to get a smooth finish. You can use brushes or sprays. Both methods have unique benefits.
Using Brushes
Brushes offer control. You can create detailed designs easily. Here are some steps to follow:
- Clean the golf ball. Use soap and water. Dry it completely.
- Choose your paint. Acrylic paint works best. It sticks well.
- Dip the brush in the paint. Use thin layers. Let each layer dry.
- Add more layers. Build up the color slowly. This prevents drips.
- Seal the paint. Use a clear coat. It protects your design.
Using Sprays
Spray paint gives an even finish. It’s faster but less detailed. Follow these steps for best results:
- Prepare the area. Work in a well-ventilated space. Cover surfaces to protect them.
- Clean the golf ball. Remove dirt and oils. Dry it well.
- Shake the spray can. Mix the paint thoroughly. This ensures an even color.
- Spray in thin layers. Hold the can 6 inches away. Let each layer dry.
- Apply a clear coat. It adds shine and protection. Your design will last longer.
| Technique | Pros | Cons |
|---|---|---|
| Brushes | Control, detail | Time-consuming |
| Sprays | Fast, even coverage | Less detail |
Choose the method that suits your needs. Enjoy painting your golf ball!
Drying Process
Painting a golf ball can be a fun project. The drying process is a crucial step. Proper drying ensures a smooth, professional finish. Let’s explore how to dry your painted golf ball effectively.
Time Required
The drying time varies based on the type of paint used. Acrylic paint typically dries within an hour. Oil-based paint may take 24 hours or more. Check the paint label for specific drying times.
Ensure the golf ball is in a dust-free area while drying. Dust can ruin the finish. Use a fan to speed up drying time. Avoid direct sunlight as it can cause cracks.
Avoiding Smudges
Smudges can ruin your hard work. Here are some tips to avoid them:
- Handle the ball with clean, dry hands.
- Use a drying rack or stand to keep the ball elevated.
- Avoid touching the painted surface until fully dry.
If possible, dry multiple golf balls at once. This saves time and effort. Arrange them so they don’t touch each other. This prevents smudges and ensures even drying.
Using A Drying Rack
A drying rack is handy for drying painted golf balls. You can make a simple one using household items:
- Get a piece of foam or cardboard.
- Poke small holes in it.
- Place toothpicks or skewers in the holes.
- Rest the golf balls on the toothpicks.
This keeps the balls elevated and allows air circulation. It ensures an even and smudge-free drying process.
Sealing The Paint
Sealing the paint on your golf ball is crucial. It ensures the paint lasts longer and stays vibrant. This section guides you on choosing the right sealant and provides application tips.
Choosing A Sealant
Choosing the right sealant is important. Here are some options:
- Polyurethane Sealant: Offers a durable, glossy finish.
- Acrylic Sealant: Dries quickly and is water-resistant.
- Epoxy Sealant: Provides a hard, protective coat.
Each sealant has its pros and cons. Pick the one that fits your needs.
Application Tips
Follow these steps to apply the sealant properly:
- Prepare the Ball: Clean the ball to remove dust.
- Apply Thin Coats: Use a brush to apply thin, even coats.
- Drying Time: Let each coat dry before applying the next.
- Final Coat: Ensure the final coat is smooth and even.
Proper application ensures a long-lasting finish. Take your time and follow these tips.
Maintenance Tips
Painting golf balls can be fun. Keeping them looking great needs care. Here are some simple maintenance tips to keep your painted golf balls in top shape.
Handling Painted Balls
Handle painted golf balls with clean hands. Dirt and oil from your hands can damage the paint. Use a soft cloth to hold the ball. Avoid dropping the ball on hard surfaces. This can chip the paint.
Store painted golf balls in a cool, dry place. Avoid direct sunlight. Sunlight can fade the paint. Use a small box or container to keep them safe. Keep them away from sharp objects.
Touch-up Techniques
Touching up your painted golf balls is easy. Keep extra paint for touch-ups. Use a small brush for precise application. Clean the area before painting. Let the paint dry completely.
If the paint chips, sand the area lightly. Use fine-grit sandpaper. Apply a thin layer of paint. Let it dry. Repeat if needed. Use a clear coat to protect the paint. This keeps your golf balls looking fresh.
| Maintenance Task | Steps |
|---|---|
| Handling |
|
| Touch-Up |
|

Credit: craftygardener.ca
Frequently Asked Questions
What Kind Of Paint Do You Use On Golf Balls?
Use acrylic paint for golf balls. It adheres well, dries quickly, and offers vibrant colors. Seal with a clear coat for durability.
Does Painting A Golf Ball Affect It?
Yes, painting a golf ball can affect its performance. The added paint may alter its weight and aerodynamics.
Will Acrylic Paint Stick To A Golf Ball?
Yes, acrylic paint can stick to a golf ball. Clean the ball thoroughly and apply a primer for better adhesion.
How To Color Golf Balls?
Use acrylic paint to color golf balls. Clean the balls first, then apply paint evenly. Let them dry completely.
Conclusion
Painting a golf ball can be a fun and rewarding project. With the right tools and techniques, you can create a unique design. Remember to let each layer dry thoroughly for the best results. Enjoy the process and showcase your personalized golf balls on the course.
Happy painting!


